前言:
之前花了很大的功夫审计了Thinkphp5.1.x的反序列化利用连,对整个反序列化的利用过程和整个代码审计的逻辑,过程都学到了很多,这次继续来分析Thinkphp5.0.X的反序列化利用连比第一次轻松,容易了许多,也学到了不少新的东西,对代码逻辑的理解又更深了。
复现环境:
thinkphp5.0.24,windows10
0x01:从与5.1不一样的地方开始入手
因为所用到的知识以及配置的环境都和5.0.24的哪一条链很类似,只不过利用的类,方式不同了,大同小异,所以我们跳过与5.1相似的地方直接从不一样的地方开始分析。
先放出payload方便分析:
1 | <?php |
和5.1一样,最初的入口都是Windows类中的destruct魔术方法,然后在file_exists中传入一个实例化对象调用此对象的toString魔术方法。这里就不多说了,不一样的也就从这里开始了。
在Payload中可以看到windows类中实例化的对象是Merge对象,而我们发现Merge对象是继承自Model对象的,所以直接来到Model类的toArray方法,到此都和5.1的链是一样的,都是进入了Model类的toArray方法,来到toArray方法后就和5.1发生了变化。
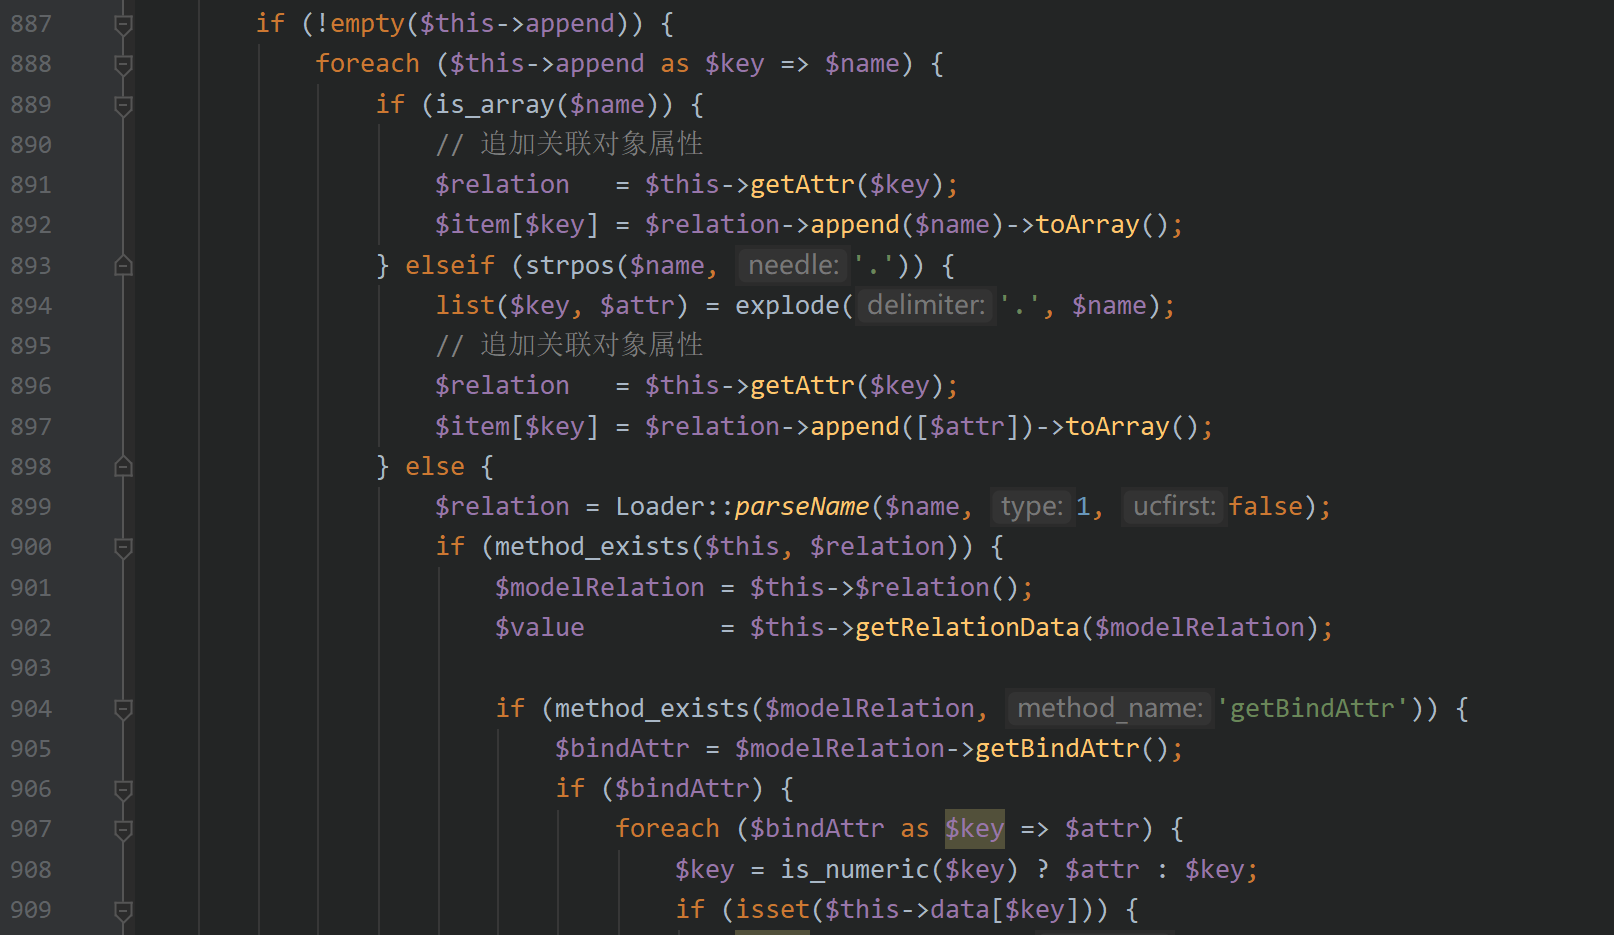
首先我们看到

在这$this->append可控,payload中将值设置为了’MENGDA’ => ‘getError’,那么在经过第一个foreach后,$key=MENGDA,$name=getError,我们看到第899行代码,进入parseName,此时传入的$name参数为getError,

可以看到parseName函数只是进行了一下格式转换,直接返回getError,此时$relation的值为getError,虽后便来到第900行代码,检测当前类中是否存在getError方法,若存在则将$modelRelation的值赋值为$this->$relation()的返回值,而此时$relation为getError,所以$modelRelation的值为model类中getError方法的返回值,我们看一下这个方法。

可以看到,getError直接返回$this->error,也就是直接返回一个我们可以控制的值。那么到现在$modelRelation的值我们可控了,根据payload可得知,我们将它控制为\think\model\relation\BelongsTo类。
紧接着我们回到toArray方法来到第902行代码,进入getRelationData()方法,代码如下:

可以看到该方法要求传入参数是一个Relation类型的类,这也是为什么我们要将$modelRealtion赋值为\think\model\relation\BelongsTo类,因为BelongsTo继承于OneToOne,

而OneToOne又继承于Relation

所以满足需求。
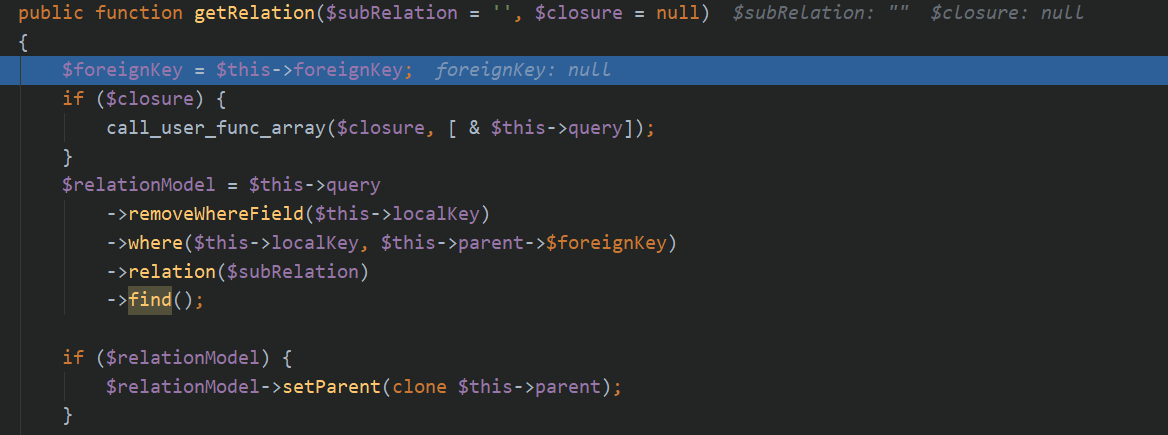
第一个if无法满足条件直接来到else,此时的$modelRelation为BelongsTo,来到BelongsTo类下的getRelation方法,

此时的$this->query的值可控,为\think\console\Output类,而output类中并不存在removeWhereField方法,所以跳转到output类中的call魔术方法中。

此处我们可以看到,if条件为$method是否存在于$this->styles中,而我们不存在的方法就是removeWhereField,所以payload中需要控制$this->style为removeField满足if条件,进入if可以看到call_user_func_array调用了当前类的block方法,我们的参数传入output类的block方法。来到block方法

将两个参数传入,$style为removeWhereField,$message为null,继续跟进来到writeln中,当前参数没有什么用所以不管他

继续跟进来到write,我们现在处于Output类中的write方法,$massages是上面block方法中writeln方法所传入的字符串,此时$this->handle为\think\session\driver\Memcache,跳转到Memcache类中的write方法

来到Memcache类中的write方法,此时$this->handler的值为\think\cache\driver\Memcached,所以跳转到Memcached类的set方法

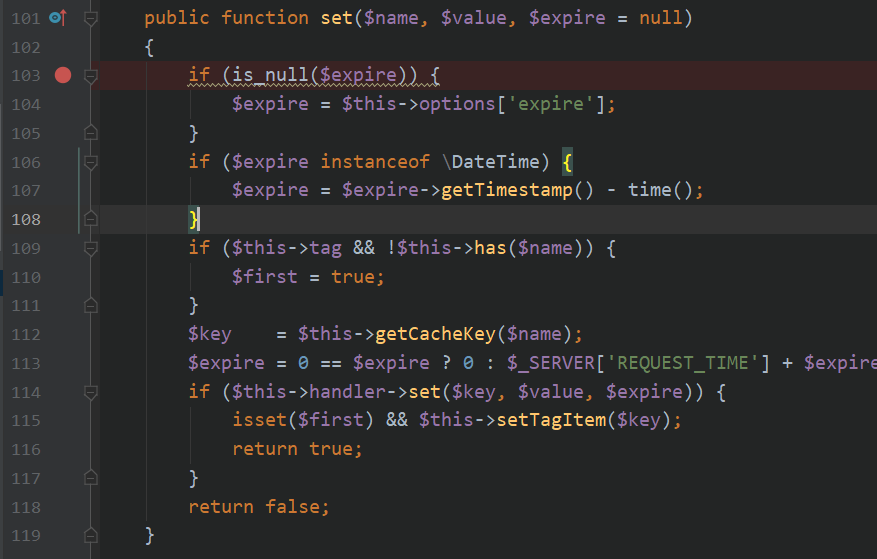
来到Memcached类中的set方法

第109行代码进入判断,进入has方法
跟进getCacheKey方法

可以看到,这里getCacheKey会返回一个$this->options[‘prefix’]和$name的拼接结果。而此时的getCacheKey是我们通过base64加密过后的危害代码,这个方法在后面会经常用到。紧接着进入下面的get方法,此时的$this->hanlder为File类,因此我们直接来到File类的get方法

可以看到$filename为拼接后的字符串,is_file为false,取反为True,直接返回default,然后回到Memached中的set方法,来到下面对$key进行赋值此时再次调用getCacheKey,得到拼接字符串。最后调用File类的set方法,传入的值为$key,$value,$expire。此时仅仅只有$key是我们可控的,其他的无法控制。
来到file类中的set方法,此时$name就是我们传入的$key

看到第150行代码,进入getCacheKey中,参数为刚刚拼接过后的字符串($key)。看到第160行代码,这里就是触发文件写入的点,将$data写入$filename,而data在这里我们是不可控的,拼接前的$data存在xeit(),即使我们的$data可控也无法让我们的危害代码执行。这里就绪要通过php伪协议将里面的内容进行加密,加密后exit()就不存在了。我选择的是base64加密,这也是为什么payload中的危害代码是通过base64加密的。

可以看到首先将$name进行md5加密后进行了拼接。得到filename。这里我们控制$this->options[‘path’]为php伪协议php://filter/convert.base64-decode/resource=./拼接后的结果为
1 | php://filter/convert.base64-decode/resource=./$name.php |
当带着这个调用file_put_contents时会将$data的内容进行base64解密过后写入./$name.php
第一次文件写入成功,可是我们并没有将危害代码写入目标服务器。怎么办?
回到Memacached.php中

在啊调用完第114行代码的set后我们进入了setTagItem方法,该方法会再次调用set函数,那么这次就给了我们可乘之机。

if条件不满足直接将$name赋值给了$value,再次调用Memached类中的set方法,而此时,$value可控。

带着$key,$value都可控的数据再次进入File类的set方法

直接来到file_put_contents处调用。将危害代码写入名字为d8ff72877afda1b924db7a6527e07dd4.php的文件中,而这个d8ff72877afda1b924db7a6527e07dd4是$name的md5值。文件写入完成。第一个8f开头的文件是第一次无法写入危害代码生成的,第二个d8开头的文件是我们可控后第二次写入的。

测试:


